
When it comes to self-care, self-massage and self-myofascial release are game-changers. They provide an accessible way to relieve muscle aches and enhance mobility from the comfort of your home.
This article will guide you through understanding the benefits of these practices, the tools you can use, and techniques for specific body parts.
I. Understanding Self-Massage and Self-Myofascial Release
Self-massage involves using simple tools to apply pressure and alleviate muscle tightness and discomfort. When we delve deeper, we encounter self-myofascial release, which targets the fascia—connective tissues encasing our muscles.
Tight fascia can lead to knots or trigger points, causing discomfort and restricting movement. Self-myofascial release enables you to massage these tight spots, promoting healthier movement and relieving tension.
Engaging in these practices boosts your muscle health, improving circulation, enhancing range of motion, and aiding post-exercise recovery. It also heightens body awareness, empowering you to respond to your body’s needs more effectively.
II. Tools for Self-Massage
The most straightforward tool for self-massage is, of course, your hand. However, a range of tools are available to enhance your self-massage practice and target different areas of the body more effectively.
- Massage Balls: Great for applying targeted pressure to specific points on the body. Ideal for areas like the neck and traps.
- Foam Rollers: Effective for massaging larger muscle groups like the quads and lats. They provide a broad pressure surface and are perfect for those new to self-massage.
- Back Massage Sticks: These tools are excellent for reaching difficult spots on the back and shoulders. They allow you to control the pressure and direction of your self-massage.
- Muscle Stick Rollers: Similar to foam rollers, but more portable and excellent for targeting smaller, specific areas, such as the calves.
- Massage Guns: This high-tech tool uses percussion therapy to help ease muscle soreness and improve mobility. It’s not a necessity for self-massage, but it’s another option if you’re looking to invest in your at-home massage toolkit.
III. Techniques for Self-Massage
This section explores specific techniques tailored for each body part.
A. Neck
The neck area is divided into two major muscles: the Sternocleidomastoid (SCM) and the Levator Scapulae.
A.1. SCM

- Start by identifying the SCM, the muscle running from the back of your ear to the front of your throat.
- Using your fingers, gently apply pressure along this muscle, moving in up and down motions.
- If you encounter a knot or a particularly tight spot, hold the pressure for 30 seconds.
A.2. Levator scapulae

- Position a massage ball between your upper shoulder blade and a wall.
- Gently roll your body against the ball, moving it up and down the muscle.
- When you come across a knot or tight spot, pause and apply pressure for about 30 seconds.
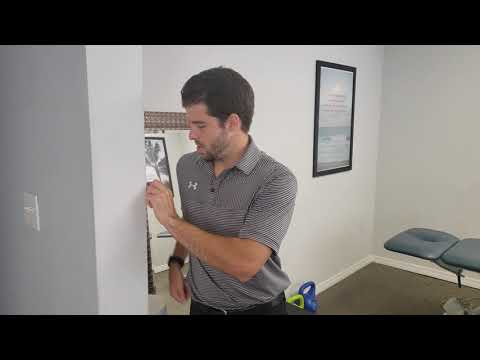
B. Upper traps
For the upper traps and lat muscles, we will use two tools for self-massage: a massage ball on a wall and a back massage stick.
B.1. Upper trap ball massage

- Place the massage ball behind your upper back.
- Roll your body gently, letting the ball massage the upper part of your trapezius muscle.
- For knots or tight spots, pause and apply sustained pressure.
B.2. Upper trap stick massage

- Hold the back massage stick with both hands and position it on your upper trapezius.
- Apply downward pressure and slide the stick along the muscle to massage it.
- If you encounter a knot or tight spot, pause and apply sustained pressure for 30 seconds.
C. Thoracic Spine
The thoracic spine will be addressed using a foam roller and a peanut massage ball.
C.1. Using a foam roller

- Lay your upper back on a foam roller and gently roll up and down.
- Be careful not to arch your lower back over the foam roller as you do this.
- Pause and hold the pressure on any knot or tight spot.
C.2. Using a peanut massage ball

This method is far more aggressive than using a foam roller and should be done with care.
- Position the peanut massage ball on your upper back, between your spine and shoulder blade.
- Gently roll against the ball, letting it massage your muscles.
- Pause and apply pressure when you encounter a knot or tight spot.
D. Lats

- Position your body sideways on a foam roller, with the roller under your armpit.
- Slowly roll down towards your waist and back up towards your armpit.
- If you encounter a knot or tight spot, hold the pressure for 30 seconds.
E. Pecs
The pecs comprise the Pec Major and the frequently neglected Pec Minor. Both contribute to our overall posture and benefit from regular massage.
E.1. Pec Major
- Find a wall and place a massage ball between it and your chest.
- Gently lean into the ball, rolling it across your Pectoralis Major.
- Hold pressure for about 30 seconds on any areas of tension you find.
E.2. Pec Minor

- To target the smaller Pectoralis Minor, move the ball a bit higher, near your armpit.
- Similar to the Pec Major, lean, roll, and apply pressure to any tight areas.
F. Hip Flexors
Hip flexors often hold a lot of tension and greatly benefit from regular massage. Let’s start with a foam roller.
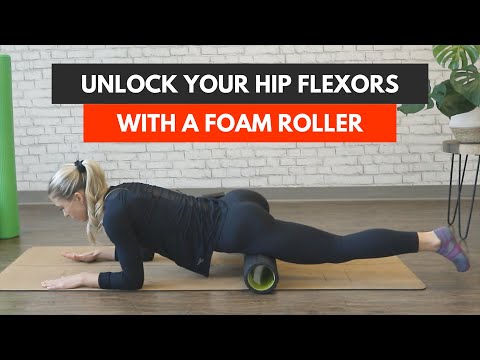
- Position the foam roller under your hip while you’re lying face down.
- Slowly move your body, allowing the roller to massage your hip flexors.
- Apply pressure to any tight spots for about 30 seconds.
If your hip flexors need more pressure, you can also use a massage ball. Position it in the same way you did the foam roller and follow the same movements.
G. Glutes
The glutes can be a source of back and leg pain if they’re too tight. Here’s how to loosen them.

- While seated on the foam roller, cross one foot over the opposite knee.
- Shift your weight onto the glute of the crossed leg and roll.
- Hold on any tight areas for about 30 seconds.
For a deeper massage of your glutes, replace the foam roller with a massage ball and perform the same movements.
H. Quads
The quads, one of the strongest muscle groups in the body, can get quite tight. Let’s give them some attention.

- Lay face down with the foam roller beneath your thighs.
- Roll from your hip down to just above your knee.
- Pause on any knots or tight spots for about 30 seconds.
You can substitute the foam roller with a massage ball for more intense pressure on your quads, replicating the same movements.
I. Calves
The calves can be quite prone to tightness, especially if you’re on your feet or run a lot.

- Sit with your calves resting on the foam roller.
- Roll from your ankle to just below your knee.
- As usual, apply pressure to any tight spots for about 30 seconds.
A muscle roller stick or a massage ball can also be used instead of a foam roller for a more intense calf massage. Just keep the same movements as with the foam roller.
J. Feet
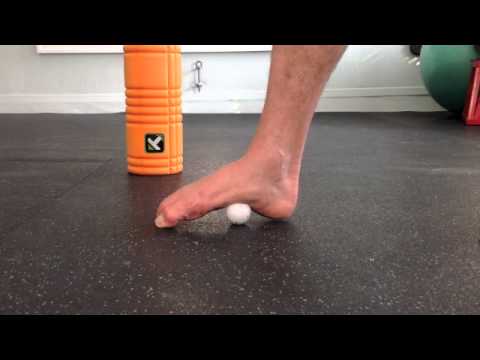
- Stand with a small ball (like a golf ball) under your foot.
- Roll the ball across the bottom of your foot.
- Pause and apply pressure for about 30 seconds on any knots or tight areas you find.
IV. Precautions and Recommendations
While self-massage can offer many benefits, it’s crucial to remember some precautions to prevent injury and ensure the most benefit from your self-care routine.
- Listen to your body. If something hurts beyond a mild discomfort, stop.
- Avoid massaging directly on bones, especially the spine.
- Be cautious if you have a pre-existing health condition. Consult your healthcare provider before starting self-massage.
As for frequency, a good rule of thumb is to perform self-massage as needed. This could be daily for particularly tense areas or every other day for maintenance. Remember, it’s not about causing pain, but releasing tension and improving mobility.
In Summary
Self-massage can be a powerful tool for maintaining mobility and reducing muscle tension, aches, and pains. By taking control of your comfort with self-massage, you empower yourself to significantly improve your mobility and alleviate muscle tension.
Remember, you’re not alone on this journey, and it’s perfectly normal to seek guidance or help if needed.


