Anterior pelvic tilt is a common postural imbalance that affects many people, often leading to discomfort, poor posture, and even pain. This condition occurs when the pelvis tilts forward, causing an exaggerated curve in the lower back. Prolonged sitting, muscle imbalances, and a sedentary lifestyle can all contribute to the development of anterior pelvic tilt. Fortunately, there are effective ways to address this issue and restore balance to your body.
This comprehensive guide will help you understand the causes and symptoms of anterior pelvic tilt and provide practical solutions to correct it. We’ll cover targeted exercises, stretches, muscle release techniques, and lifestyle changes to support long-term improvement.
I. Understanding anterior pelvic tilt

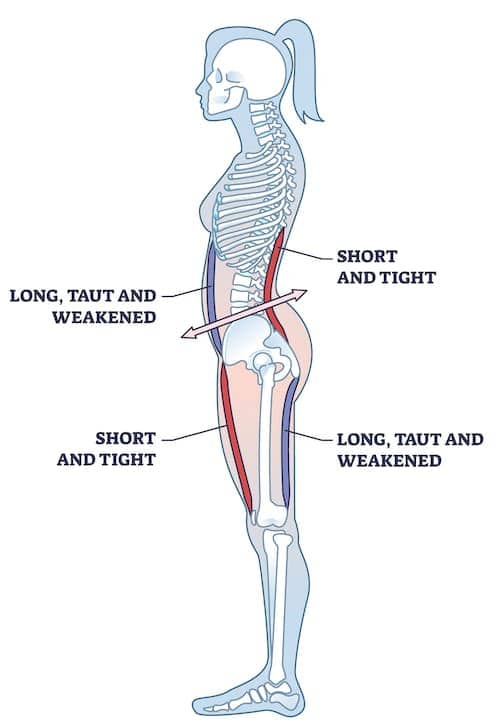
Anterior pelvic tilt refers to a postural imbalance where the front of the pelvis tilts downward, causing an exaggerated curve in the lower back. This condition often results from a combination of muscle imbalances, including tight hip flexors, tight quads, tight lower back muscles, weak glutes, weak hamstrings, and a weak core.
Sedentary lifestyles and prolonged sitting can lead to these muscle imbalances. When you sit for extended periods, your hip flexors and quads can become shortened and tight, while your glutes, hamstrings, and core muscles can become weak due to underuse. As a result, the tight muscles pull the front of your pelvis downward, and the weak muscles struggle to counteract this pull, causing anterior pelvic tilt.
In addition to causing an exaggerated curve in the lower back (lordosis), anterior pelvic tilt can also result in a protruding abdomen and a forward-leaning posture. Over time, this can lead to lower back pain, hip pain, and other postural issues, such as rounded shoulders and forward head posture.
Addressing the muscle imbalances contributing to anterior pelvic tilt is essential for preventing discomfort, pain, and long-term problems.
II. Assessing your pelvic tilt
You can use visual clues, and a self-assessment test called the Thomas test to determine if you have an anterior pelvic tilt.
A. Visual clues
Look for the following signs in your posture, which may indicate anterior pelvic tilt:
- An exaggerated curve in the lower back (lordosis)
- Forward tilt of the pelvis, making the buttocks more prominent
- Protruding abdomen
- Forward leaning posture, with shoulders and head also leaning forward
B. Self-assessment
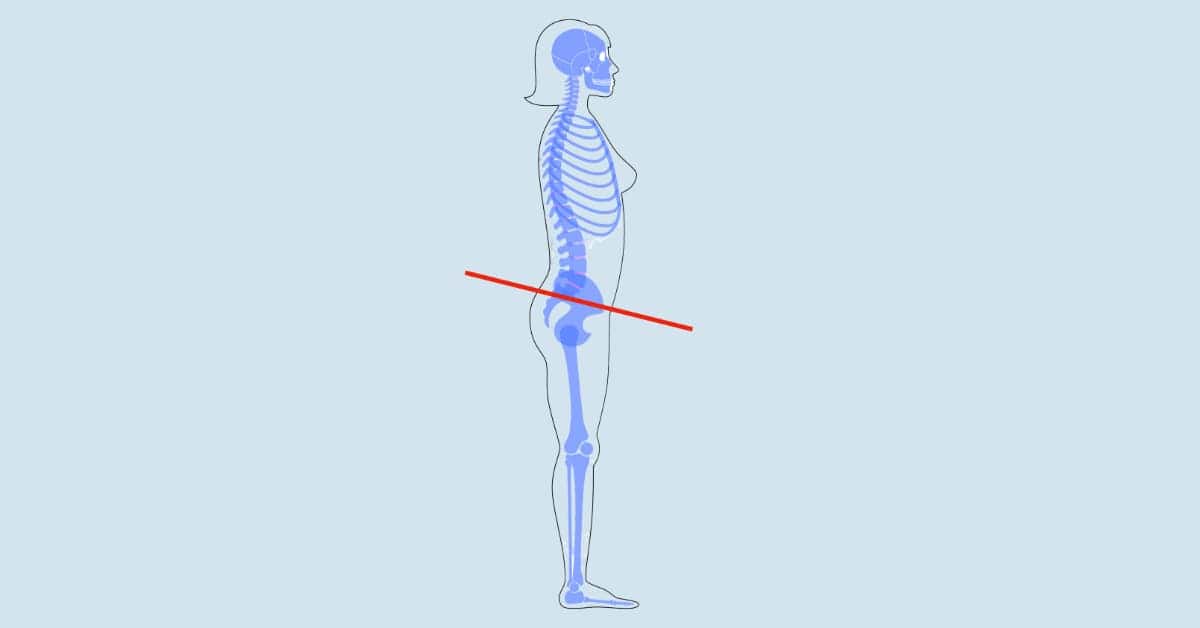
In this self-assessment test, you will locate two points on your pelvis: the ASIS (Anterior Superior Iliac Spine) and the PSIS (Posterior Superior Iliac Spine). To perform the test, follow these steps:
- Locate the ASIS, which is the bony ridge on the front of your hip bone, and place a marker on it.
- Locate the PSIS, which can be found just below the dimples in your lower back, to the left and right of the spine, and place a marker on it.
- Imagine drawing a line between the ASIS and PSIS markers. Observe the angle between these two points from the side. If the angle is greater than around 7 degrees, with the front lower than the back, it may indicate an anterior pelvic tilt.
Keep in mind that some pelvic tilt is normal and healthy. However, an excessive tilt can lead to discomfort and long-term issues. Watch the video above for a visual demonstration of the self-assessment test.
C. Thomas test
The Thomas test helps identify tight hip flexors, which can contribute to anterior pelvic tilt [1]. Here’s how to perform the test:
- Find a firm surface, such as a bench or table, and sit on the edge.
- Bring one knee toward your chest and hold it with both hands.
- Slowly lie back while keeping the other leg hanging off the edge.
- Observe the position of the hanging leg. If it remains elevated with a gap between the back of your thigh and the surface, you may have tight hip flexors, which can contribute to anterior pelvic tilt.
III. Targeting key muscle groups for anterior pelvic tilt correction
This section will focus on addressing the muscle imbalances associated with anterior pelvic tilt. Our goal is to provide remedies that target the specific areas contributing to the condition. We will cover the following:
- Massage and stretch the hip flexors
- Massage and stretch the quads/thighs
- Stretch the lower back
- Strengthen the glutes
- Strengthen the hamstrings
- Strengthen the core
By incorporating these targeted exercises, stretches, and muscle release techniques into your routine, you can work towards correcting anterior pelvic tilt and improving your overall posture and comfort.
A. Muscle release techniques
Before diving into stretching and strengthening exercises, performing myofascial release of the tight muscles that contribute to anterior pelvic tilt is a good idea, myofascial release helps remove trigger points and massages the muscles, addressing chronic tightness that keeps the muscles tense.
1. Hip Flexor release
- Place a foam roller on the ground.
- Lie face-down with the foam roller positioned under your hip flexor area, located at the top of your thighs near your pelvis.
- Roll back and forth, focusing on the tight spots and applying gentle pressure.
- Pause on tight spots for 30 seconds.
2. Tensor fasciae latae (TFL)
The tensor fasciae latae (TFL) is a hip flexor muscle often requiring special attention when addressing anterior pelvic tilt.
- Place a foam roller on the ground.
- Lie on your side with the foam roller under your TFL, a small muscle on the outer side of your hip, near the top of your thigh.
- Roll back and forth, focusing on the tight spots and applying gentle pressure.
- Pause on tight spots for 30 seconds.
3. Quad release
- Place a foam roller on the ground.
- Lie face-down with the foam roller positioned under your quads.
- Roll back and forth, focusing on the tight spots and applying gentle pressure.
- Pause on tight spots for 30 seconds.
Consider using a massage ball instead of a foam roller for a more intense muscle release. A massage ball can provide deeper and more targeted pressure on tight spots. Be cautious and gentle when using a hard massage ball, as it can be more intense than a foam roller.
B. Stretches
Once the tight muscles have been released, stretching is important to increase flexibility and reduce the pulling effect on the pelvis.
1. Hip flexor stretches
a. Kneeling hip flexor stretch
- Kneel on one knee, with the other foot flat on the ground in front of you.
- Gently push your hips forward, keeping your upper body upright.
- Hold for 30 seconds and switch sides.
b. Standing hip flexor stretch
- Stand with one foot forward and the other foot behind you.
- Bend your front knee, keeping your back leg straight, and lower your back knee toward the ground.
- Hold for 30 seconds and switch sides.
Related: How to relieve tight hips
2. Quads stretches
a. Standing quad stretch
- Stand and hold onto a wall or chair for balance.
- Grab your ankle and gently pull your heel toward your buttocks.
- Hold for 30 seconds and switch sides.
b. Lying quad stretch
- Lie on your side and grab your top ankle, pulling your heel toward your buttocks.
- Keep your knees together and maintain a straight line with your body.
- Hold for 30 seconds and switch sides.
3. Lower back stretch
Child’s pose
- Kneel on the ground with your knees hip-width apart and your feet together.
- Sit back on your heels and reach your arms forward, resting your forehead on the ground.
- Hold for 30 seconds.
Related: Best lower back stretches
C. Strengthening exercises
This next section focuses on building strength in weak muscles that need strengthening to help pull your pelvis into a neutral position.
1. Core strengthening
a. Plank
- Start in a push-up position with your forearms on the ground and your elbows under your shoulders.
- Keep your body in a straight line from head to toe.
- Hold this position for 30 seconds, working up to 1 minute as you strengthen.
b. Dead bug
- Lie on your back with your arms extended toward the ceiling and your knees bent at a 90-degree angle.
- Slowly lower your right arm and left leg toward the ground, pressing your lower back into the floor.
- Return to the starting position and repeat on the opposite side.
- Perform three sets of 12-15 repetitions on each side.
3. Glute and hamstring strengthening
a. Glute bridges
- Lie on your back with your knees bent and feet flat on the ground, hip-width apart.
- Lift your hips toward the ceiling, squeezing your glutes at the top of the movement.
- Slowly lower your hips back to the ground.
- Perform three sets of 12-15 repetitions.
b. Donkey kicks
- Start on your hands and knees, with your wrists under your shoulders and your knees under your hips.
- Keeping your right knee bent at a 90-degree angle, lift your right leg behind you, driving your heel toward the ceiling.
- Lower your leg back to the starting position.
- Perform three sets of 12-15 repetitions on each leg.
c. Squats
- Stand with your feet shoulder-width apart, toes slightly outward.
- Keep your chest lifted, and gaze straight ahead.
- Lower until thighs are parallel to the ground or as flexibility allows.
- Push through your heels to return to starting position.
- Perform three sets of 12-15 repetitions.
IV. Additional lifestyle changes
Ergonomics
Ensure your work environment promotes proper posture, particularly if you spend significant time working at a desk. Use an ergonomic chair and adjust your computer monitor to eye level.
Movement
Prioritize movement throughout your day. Break up long periods of sitting with brief walks or stretches. Incorporate regular physical activity into your daily routine, which can help improve overall posture.
Posture awareness
Develop a habit of checking your posture throughout the day. Engage in exercises and activities that promote overall posture improvements, such as yoga or Pilates. These activities can help increase your body awareness and make it easier to maintain proper alignment.
Path to Posture Improvement
Correcting anterior pelvic tilt involves addressing the muscle imbalances contributing to the condition. Establishing a consistent routine of muscle release techniques, stretches, and strengthening exercises, along with making additional lifestyle changes such as focusing on ergonomics, movement, and posture awareness, can help you alleviate the symptoms associated with anterior pelvic tilt and enjoy a healthier, more comfortable life.
Remember that progress may be slow, and it’s essential to be patient and persistent as you work towards improving your posture. You may also want to check for glute amnesia, a condition where the glutes “switch off” and don’t activate properly during exercises.
Becoming aware of this issue and consciously engaging your glutes during workouts can ensure optimal results in your journey to correct anterior pelvic tilt. Stay committed to your posture improvement journey, and enjoy the benefits of a healthier, more balanced body.


